You’ve secured the gallery. You’ve set the date. Now comes the part that separates amateur exhibitions from professional ones, getting your prints absolutely right.
Here’s the thing: exhibition printing isn’t the same as printing for your portfolio or online shop. Gallery walls demand a level of quality that makes visitors stop, lean in, and feel something. One poorly prepared print can undermine months of creative work.
We’ve helped hundreds of artists prepare for exhibitions across the UK, from local community galleries to major London shows. Here’s our battle-tested 5-step process for going from digital file to gallery-ready prints that look absolutely stunning.
Step 1: Curating Your Exhibition Work
Before you even think about file prep, you need to choose the right pieces, and this is harder than it sounds.
Gallery walls are unforgiving. What looks brilliant on your studio wall or laptop screen might not have the same impact when surrounded by other work under gallery lighting. Here’s what to consider:
Cohesion Over Variety
Your exhibition should tell a story. Whether it’s a consistent colour palette, subject matter, or artistic technique, visitors should feel like they’re experiencing a collection, not just looking at random pieces you happened to create.
Technical Quality First
Be ruthless about image quality. If your original artwork was photographed or scanned, you need high-resolution files, minimum 300 DPI at your final print size. That A2 landscape painting? You’ll need a file that’s at least 7016 × 4961 pixels.
💡 Pro tip: Don’t have high-res files of your originals? Our professional artwork scanning service can capture every detail, brushstroke, and texture at the resolution you need for exhibition-quality prints.
Consider the Space
Think about where your work will hang. Large, open gallery walls can handle bigger pieces and bold statements. Intimate spaces work better with smaller, detailed prints that reward close viewing.
Step 2: Test Prints & Proofing (This is Non-Negotiable)
Here’s where most artists make their biggest mistake: they skip the test print.
You cannot judge final print quality from your screen. Even with a perfectly calibrated monitor, fine art printing introduces variables you won’t see digitally, paper texture, ink absorption, colour shift under gallery lighting, and more.
What You Should Proof
- Colour accuracy: Does your sunset actually look warm and vibrant, or is it leaning too orange?
- Shadow detail: Can you see the detail in darker areas, or do they look muddy?
- Highlight preservation: Are your whites blown out, or do they retain subtle tones?
- Overall contrast: Does the print have the punch and depth your original has?
The Smart Proofing Strategy
You don’t need to proof every single piece at full size (though you can if budget allows). Here’s what we recommend:
- Proof one piece at full size from your exhibition to check overall impact
- Proof colour-critical or technically challenging pieces at A4 or A3
- Check all files at actual size for sharpness and detail before committing
We can produce test prints quickly and affordably, think of it as insurance against unwanted surprises on opening night.
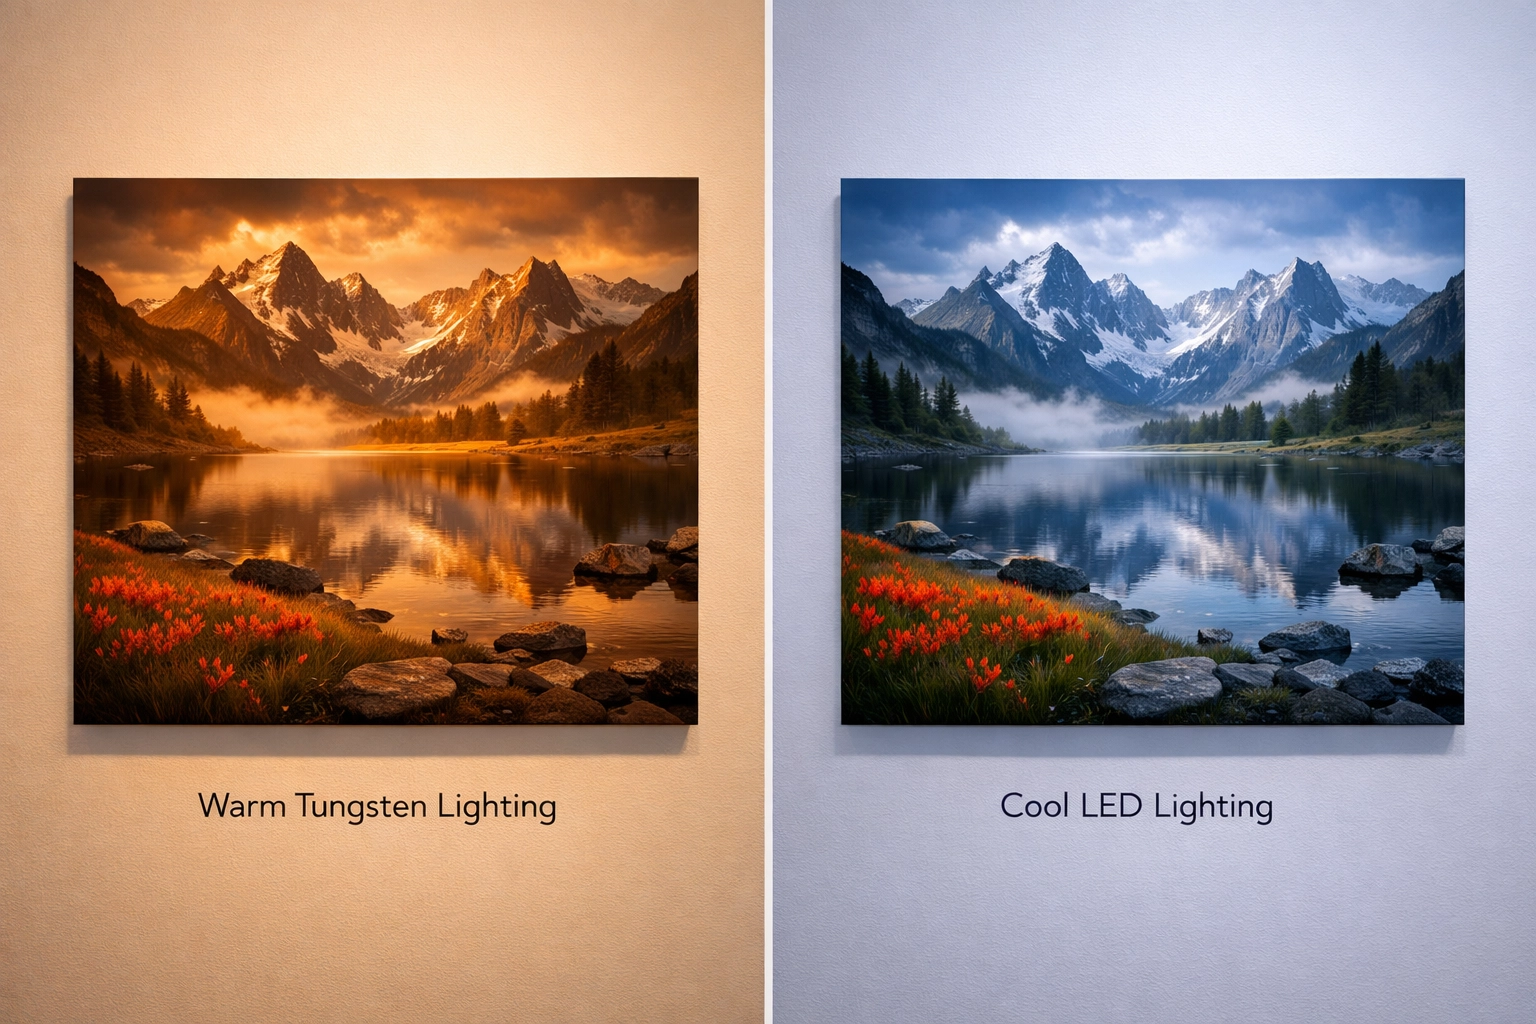
💡 Pro tip: View your test prints under similar lighting to your gallery space. Warm tungsten lighting can make prints look completely different from cool LED gallery spots.
Step 3: Choosing the Right Paper
This is where your exhibition can go from “nice” to “museum-quality.”
Paper choice affects everything: colour vibrancy, longevity, perceived value, and how your work interacts with light. For giclée prints UK artists trust for exhibitions, you need archival-quality fine art papers that’ll last 100+ years without fading.
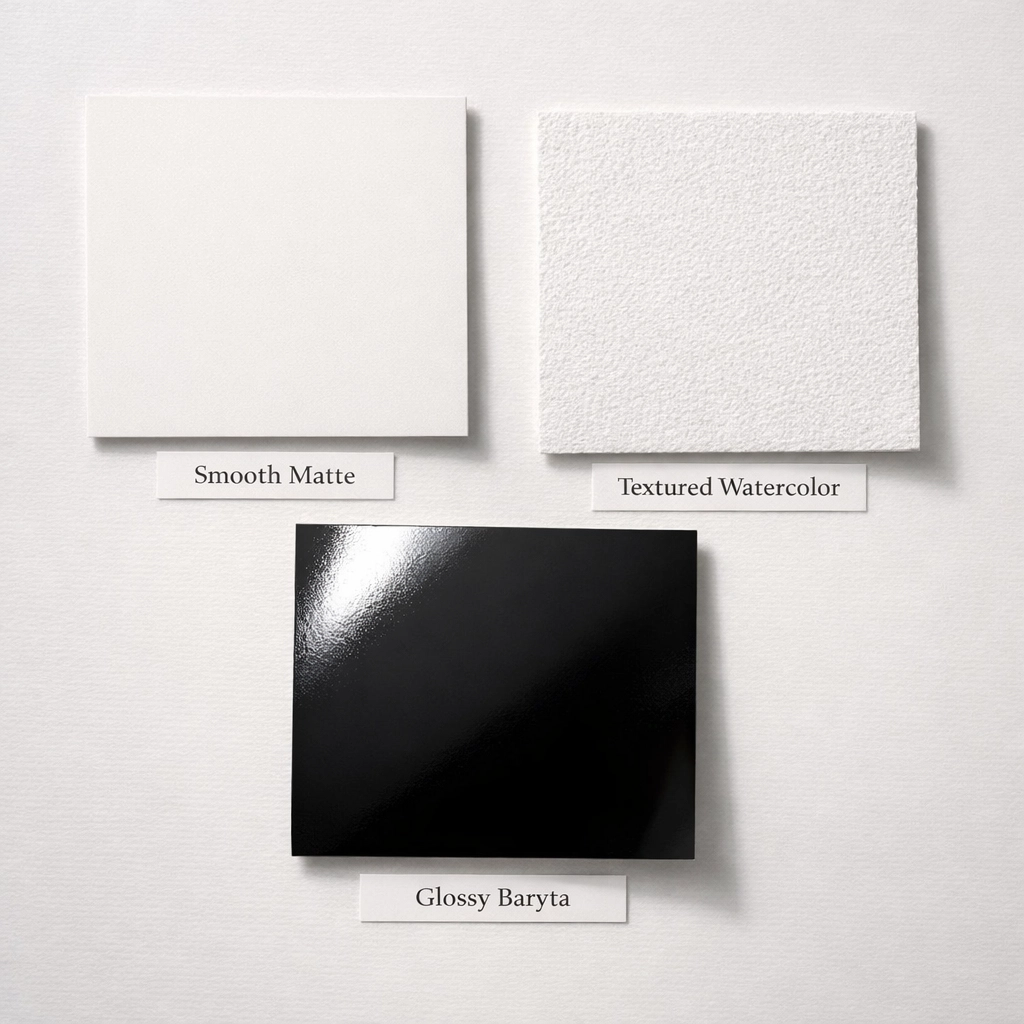
The Three Main Options
| Paper Type | Best For | Characteristics |
|---|---|---|
| Smooth Matte | Photography, detailed digital art | Clean, modern look with no glare |
| Textured Fine Art | Paintings, traditional media | Adds depth and tactile quality |
| Baryta/Glossy | High-contrast photography | Maximum colour vibrancy and depth |
Making Your Decision
Match your paper to your original medium:
- For Paintings: Textured papers like Hahnemühle German Etching or Canson Platine mimic the feel of traditional art papers
- For Photography: Smooth baryta or lustre papers deliver that gallery-standard crisp detail
- For Mixed Media: Matte fine art papers offer versatility without competing with your subject
Not sure which paper suits your work? Our comprehensive paper guide breaks down every option, or just get in touch, we’re always happy to send you sample swatches.
Step 4: Mounting & Framing Considerations
Your prints are gorgeous. Now let’s make sure they’re exhibition-ready in terms of presentation.
While we’re fine art printers UK galleries trust, not framers, here’s what you need to consider:
Professional Mounting
Most galleries expect prints to arrive mounted or ready to hang. Common options include:
- Foam board mounting for lighter pieces
- Dibond (aluminium composite) for larger prints that need rigidity
- Float mounting to show the full paper edge: beautiful for textured fine art papers
Framing Basics
Keep it simple and consistent. Your frames should:
- Complement your work without overpowering it
- Be consistent across the exhibition (same colour, same style)
- Use UV-protective glazing to protect prints from fading
- Be properly wired and ready to hang
💡 Pro tip: White or natural wood frames work for almost any exhibition style. Save coloured or ornate frames for solo shows where you want to make a specific statement.
Step 5: Timeline Planning (Start Earlier Than You Think)
This is the step that’ll save you from last-minute panic.
The Exhibition Timeline Breakdown
6-8 Weeks Before Opening:
- Finalise your selection
- Get artwork professionally scanned if needed
- Order initial test prints
4-6 Weeks Before:
- Review test prints and make adjustments
- Place your final print order
- Start sourcing frames and mounting materials
2-4 Weeks Before:
- Receive and inspect all prints (check for any defects immediately)
- Mount and frame all pieces
- Create labels with titles, medium, dimensions, and pricing
1 Week Before:
- Deliver framed work to gallery
- Install (if you’re doing your own hanging)
- Final checks under gallery lighting
Why This Timing Matters
Fine art printing UK standards mean we’re using archival pigment inks that need proper drying time. Rush jobs don’t allow for the quality control or reprints you might need. Plus, during busy exhibition seasons (spring and autumn), print turnaround times can extend.
We typically recommend allowing 2-3 weeks for printing and delivery of exhibition orders: but if you need something faster, contact us and we’ll do our best to accommodate rush orders.
Your Exhibition Printing Checklist
Let’s make this simple. Before you hit “confirm” on your exhibition prints, you should have:
- ✅ High-resolution files (300 DPI minimum at final size)
- ✅ Test prints reviewed and approved
- ✅ Paper selection finalised
- ✅ Print sizes confirmed to fit your gallery space
- ✅ 6-8 weeks lead time before your opening
- ✅ Framing and mounting plan in place
- ✅ Budget allocated (printing + framing + shipping)
Ready to Print Your Exhibition?
Getting ready for an exhibition is exciting: and yes, a little stressful. But with the right fine art printers UK galleries recommend in your corner, you can focus on what matters: your art.
At Giclée UK, we’ve specialised in exhibition-quality printing for artists across the UK. We understand gallery standards, colour accuracy, and the pressure of opening night deadlines. Whether you need professional scanning, test prints, or full-scale exhibition production, we’re here to help.
Need exhibition support? Get in touch or request a quote today. Let’s make sure your exhibition looks absolutely stunning from file to gallery wall.
Related Reading: